Blurring for Beginners
Introduction
This is a short tutorial on blurring techniques for beginners. When I was learning this stuff, there was very little available material which was useful. That's not true of course - there was masses of material, but half of it was way too simple and the other half began "Let T be a vector function evaluated over the half-open interval...." and was full of very scary multi-line equations with those big sigma symbols and things. This article is meant to remedy that. I'll talk about various kinds of blur and the effects you can use them for, with source code in Java.
A Disclaimer
Whenever blurring is mentioned, there's always somebody who says "Hey! That's not a real motion blur!", or writes angry letters in green ink complaining that the mathematics is dubious or that there's a much faster way to do this using the sponglerizer registers on the HAL-9000. Ignore these people. This is a big subject, and this article is just for beginners (of which I can proudly say I am one). What matters is you get the results that you're aiming for, and if the results you're aiming for require dubious mathematics, then so be it. If the results you're aiming for look horrible to me, then that's fine, as long as they look good to you.
Another Disclaimer
There's source code in Java for pretty well everything I talk about here. I make no claims that these are optimised in any way - I've opted for simplicity over speed everywhere and you'll probably be able to make most of these thing go faster with a bit of effort. You can use the source code for anything you want, including commercial purposes, but there's no liability. If your nuclear power station or missile system fails because of an improper blur, it's not my fault.
What is Blurring?
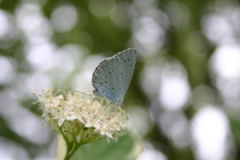
We all know what blurring is, don't we? It's that thing that happens when your camera is out of focus or the dog steals your glasses. What happens is that what should be seen as a sharp point gets smeared out, usually into a disc shape. In image terms this means that each pixel in the source image gets spread over and mixed into surrounding pixels. Another way to look at this is that each pixel in the destination image is made up out of a mixture of surrounding pixels from the source image.
The operation we need for this is called convolution. This sounds complicated but thats only because mathematicians like to make things sound complicated in order to maintain that air of magic and keep the funding rolling in. Well, I'm onto them and I can reveal that convolution is not that complicated (at my level anyway). The way it works is this: we imagine sliding a rectangular array of numbers over our image. This array is called the convolution kernel. For every pixel in the image, we take the corresponding numbers from the kernel and the pixels they are over, multiply them together and add all the results together to make the new pixel. For example, imagine we want to do a really simple blur where we just average together each pixel and its eight immediate neighbours. The kernel we need is:
	1/9 1/9 1/9
	1/9 1/9 1/9
	1/9 1/9 1/9
Notice that these all add up to 1, which means that our resulting image will be just as bright as the original.
Without further ado, let's blur an image in Java. All that convolution stuff sounds tricky to implement, but luckily Java comes with a built-in and ready-to-use operator to do exactly that. I'm talking ConvolveOp here. Here's the code:
    float[] matrix = {
        0.111f, 0.111f, 0.111f,
        0.111f, 0.111f, 0.111f,
        0.111f, 0.111f, 0.111f,
    };

    BufferedImageOp op = new ConvolveOp( new Kernel(3, 3, matrix) );
	blurredImage = op.filter(sourceImage, destImage);


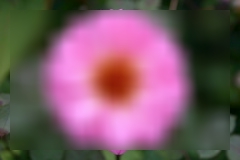
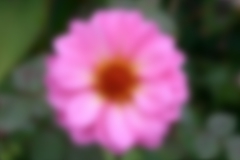
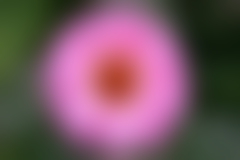
The Original and Blurred Images
Fantastic! A blurry image! It's not very blurry though. Let's do a really big blur like this:
	float[] matrix = new float[400];
	for (int i = 0; i < 400; i++)
		matrix[i] = 1.0f/400.0f;

    BufferedImageOp op = new ConvolveOp( new Kernel(20, 20, matrix), ConvolveOp.EDGE_NO_OP, null );
	blurredImage = op.filter(sourceImage, destImage);
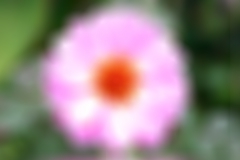
Big Blur with ConvolveOp
Hmmmmmm. Well that's not so good. Not only did it take a really long time, but the result is slightly odd - everything looks, well, sort of square, and what on earth has happened around the edges?
First the edges: ConvolveOp is a timid namby-pamby thing which is scared of falling off the edge of the image. If the kernel would overlap the edge of the image, it just gives up and just leaves the pixel unchanged. You can change this by passing EDGE_ZERO_FILL instead of EDGE_NO_OP, but that's even worse - the pixels round the edge just get set to zero and effectively disappear. What shall we do? Well, we could pad the image out around the edges before blurring and crop the result, but that's just giving in, and besides we wouldn't learn anything. Instead, we'll write a proper, fearless, no-nonsense operator which isn't scared of edges. We'll call it ConvolveFilter to distinguish it from ConvolveOp. I'm not going to do into details of the source in this article - there's not enough time or space and we have a lot more filters to write yet, but you can download or view the source and it should be fairly self-explanatory.
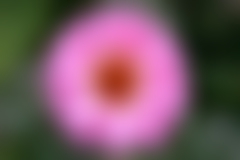
Now the squareness problem: The reason everything looks square is because what we're doing here is called a box blur - our kernel is shaped like a square, as if we're using a camera which has a square aperture. Incidentally, don't let anyone tell you that box blurs are useless - in fact if you're simulating the shadow cast by a square light, it's exactly what you want. Anyway, they'll come in useful further on. Another thing: don't get confused - I'm using the term box blur to refer to the shape of the kernel, not its profile, which I'm going to call a box filter. More on this later on. To get a more realistic blur, what we should have done is used a circle-shaped kernel. This simulates much better what a real camera does.
That's much better. We'll come back to this later on, but first a diversion back to the box blur.
Box Blur
We've solved the edge pixel problem, but our blur is still going really slowly, and things are only going to get worse. The problem is that the number of multiplications in the convolution is going up as the square of the kernel radius. With a 100x100 kernel, we're going to be doing 10000 multiplies and adds per pixel (approx). How can we get round this? It turns out that there are more ways to go about this than I've possibly got time to write about, or even bother to look at. One way I will mention quickly before sweeping it under the rug is this: You can do a box blur by shrinking down your image, blurring it and scaling it up again. This may be fine for your purposes, and you should bear it in mind. One problem is that it doesn't animate very well, but may not be a concern to you.
Let's look at the box blur again: It turns out that there's a couple of really easy ways to speed this up. Firstly, it turns out that the box blur is separable. This means that we can do a 2D blur by doing two 1D blurs, once in the horizontal direction and once in the vertical direction. This is much faster than doing the 2D blur because the time taken goes up in proportion to the kernel size, not as its square. Secondly, Think about the window that we're sliding across the image. As we move it from left to right, pixels come in at the right edge and are added to the total and at the same time pixels leave the left edge and are subtracted from the total. All we need to do is just do the add and subtract for the entering and leaving pixels at each step instead of adding together all the pixels in the window. We only need to store a set of running totals which are the width or height of the kernel. This gives a massive speed improvement at the cost of having to write some code. Luckily, I've written the code for you, so you win all round. We need two passes, once to blur horizontally and once vertically. The code for these is, of course, quite different. But wait! There's a trick we can do which allows us just to write the code once. If we write a blurring function which does the horizontal blur but writes its output image transposed, then we can just call it twice. The first pass blurs horizontally and transposes, the second pass does the same, but as the image is now transposed, it's really doing a vertical blur. The second transposition makes the image the right way up again and voila! - a very fast box blur. Try it out in this applet:
And here's the source code....
You may have noticed that we have only used an integer radius so far which makes it easy to work out the array indices for the blurring. We can extend the technique to do sub-pixel blurring (i.e. a non-integral radius) simply by linear interpolation between the array values. My source code doesn't do this, but it's easy to add.
Gaussian Blur
Now it's time to address the speed and square-looking blur issues at the same time. To get rid of the square look to the blur, we need a circular-shaped kernel. Unfortunately, the trick we used for box blurs doesn't work with a circle but there's a loophole: If the kernel has the right profile - the Gaussian profile - then we can do a 2D blur by performing two 1D blurs, just like we did with the box blur. It's not so fast because the sliding window trick doesn't work, but it's still a lot faster than doing the 2D convolution. The profile we need is the familiar bell-shaped, or Gaussian curve that you've heard of:
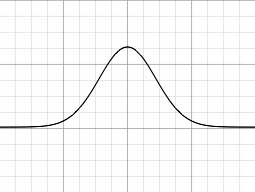
Gaussian Blur
Here's some code to create a 1D Gaussian kernel for a given radius. All we need to do is to apply this twice, once horizontally and once vertically. As a bonus, I've wrapped it up in a GaussianFilter to make it easy to use.
This is why the Gaussian blur is found in every graphics package - it's much faster than other types of blur. The only problem is that it's not very realistic when it comes to simulating camera lenses, but more on that later. If you want to do things like simulating shadows, then the Gaussian blur, or even the box blur may be just fine. There's a place for all these effects - just because they aren't realistic doesn't mean they're not useful.
The Gaussian blur is much faster, but it's nowhere near as fast as our box blur we did earlier on. If only there was some way to combine the two. I imagine you've guessed by now that there might be one, so I'll not hold the suspense any longer: If you do a lot of box blurs, the result looks more and more like a Gaussian blur. In fact, you can prove it mathematically if you've a spare moment (but don't tell me how - I'm not interested). In practice, 3 to 5 box blurs look pretty good. Don't just take my word for it: The box blur applet above has an "Iterations" slider so you can try it out for yourself.

Box Blur: 1, 2 and 3 iterations
Alpha Channels
A quick diversion here to discuss a problem which often crops up: Imagine you want to blur a shape which is on a transparent background. You've got an empty image, and you draw a shape on it, then blur the image. Hang on - why does the blurry bit look too dark? The reason is that we've blurred each channel separately, but where the alpha channel is zero (the transparent bits), the red, green and blue channels are zero, or black. When you do the blur, the black gets mixed in with the opaque bits and you get a dark shadow. The solution is to premultiply the image alpha before blurring and unpremultiply it afterwards. Of course, if your images are already premultiplied, you're all set.

Blur: Separate and Premultiplied Alpha
Motion Blur
Time for a change of direction. So far we've only talked about uniform blurs, but there are other types. Motion blur is the blur you get when an object (or the camera) moves during the exposure. The image gets blurred along the apparent path of the object. Here we're just going to be talking about simulating motion blur on an existing still image - doing motion blur in animations is a whole different area. We're also only going to be blurring the whole image - we're not going to try and blur an object in the image.
The good news is that we've already done simple motion blur. Go back to the box blur applet above and set the horizontal radius to, say 10, and the vertical radius to zero. This gives you a nice horizontal motion blur. For some purposes, this may be all you need. For example, one way to produce a brushed metal texture is to take an image consisting of random noise and apply a motion blur.
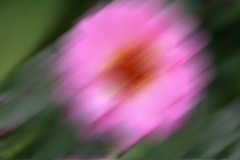
If we want to blur in a direction other than horizontal or vertical, then things get more complicated. One technique might be to rotate the image, blur and then rotate back. What we'll do here though is to do it the hard and slow way. What we need to do is loop over the image, and for every pixel, add up all the pixels along the motion path. For a straight motion blur, this just means following a straight line from the pixel, but you could follow a wiggly path if you wanted to simulate long-exposure camera shake, say.
Spin and Zoom Blur
Once we've got the code for motion blur in place, it's a simple matter to modify it to do zoom and spin blurs, or even a combination of all three. It's just a matter of following the right path for each pixel. For radial blurs, just follow a path going from the blur center. For a spin blur, follow a tangential path.
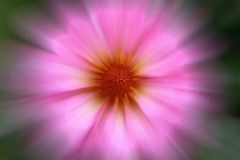
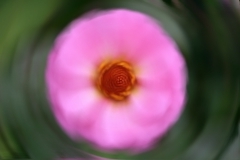
Zoom and Spin Blur
Try it out in this applet:
Here's the source code for doing these three types of motion blur:
Faster Motion Blur
You may have noticed that doing the motion blur is a pretty slow business - all those sines and cosines really slow things down. If we're not so worried about quality though, we can speed this up. All we need to do is add together a lot of transformed versions of the image in a clever way. The clever part is that we can do a 1-pixel motion blur by averaging the image and the same image translated by one pixel. We can do a 2-pixel blur by repeating this with the 1-pixel blurred images. By repeating this we can do an N-pixel blur in log2(N) operations, which is a lot better than doing it the hard and slow way. Zoom and spin blurs can be done by scaling and rotating instead of translating. One filter will do all three using an AffineTransform.
Try it out in this applet:
Domain Shifting
There's yet another way to do these motion blurs: Remember I said you could do the linear motion blur by rotating the image, doing a horizontal box blur and rotating back? Well, the same is true of the zoom and spin blurs, except you need something more complicated than rotation. What you need is the polar transform:

Polar Transform
Once you've transformed your image, a horizontal box blur is a spin when you transform back, and a vertical box blur gives you a zoom blur. One detail is that you need a special horizontal box blur which wraps at the edges otherwise you'll get a sharp vertical line in your blurred image where the spin angle should wrap round.
Blurring by Fourier Transform
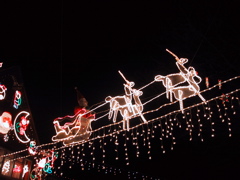
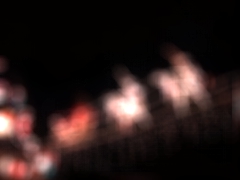
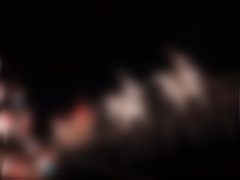
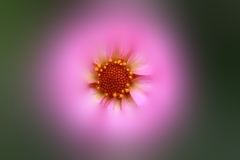
The Gaussian blur is very fine when you want that Gaussian blur effect, but what if you want a proper lens blur which simulates a real camera aperture? Watch any film or TV program for a while, especially something shot at night with lights in the background, and you'll see that things which are out of focus form disk shapes, or perhaps pentagons. There's also a phenomenon called blooming where bright parts of the image wash out the image, becoming even brighter compared to the rest. These shapes are called Bokeh. Some people love it and some people hate it. We don't care whether people love it or hate it, we just want to reproduce it.
Bokeh (real, not faked)
You won't get those disk shapes with Gaussian blur - it's just too fuzzy round the edges. What you need to do it use a nice sharp-edged convolution kernel in the shape of your camera aperture. The problem you'll come across here is that all those tricks to do with separable kernels, iterated box blurs and the like won't work here - there's no separable kernels which will give you a pentagon (well, probably - I'm no mathematician) - we're back to the old problem of the blur time going up as the square of the blur radius. Fear not, we can turn the heavy mathematical guns onto the problem. I don't know how the heavy guns work, but I can aim them.
The heavy guns are Fourier Transforms. I don't know how they work because I wasn't listening in my university lectures, but there's a vast amount on the subject you can find on the Internet, although practically nothing practical (i.e. with source code) on the subject of blurring. With Fourier Transforms, you can make a blur which takes a time unaffected by the blur radius (in practice, dealing with the image edges means this isn't quite true). Unfortunately, this means that for a small radius, it's slow, but you really win with a large radius. One way to deal with this is to use the simple convolution for small radii, and switch to Fourier Transforms when you reach to crossover point in time, assuming you've done the experiments to determine where that is. But be careful, if you're animating a blur, you've got to make sure that you don't get any visible artifacts at the point where you switch algorithm - the eye is really good at spotting those. For that reason, you may prefer to stick with one algorithm for the whole of an animation. For still images, nobody is going to notice. Really.
Lens Blur with Blooming
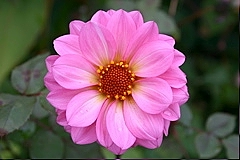
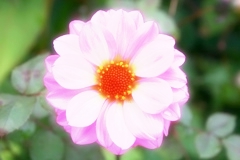
Does it really look any different? Surely, we can get away with a Gaussian blur? Well, here's an example which will help you make up your mind.

Original, Lens Blur, Triangle Aperture and Gaussian Blur
Convinced?
The principle behind doing the blur is not too hard, although it seems like magic. What we do is take the image and the kernel, and perform the Fourier transform on them both. We then multiply the two together and inverse transform back. This is exactly the same as performing the long convolution above (apart from rounding errors). You don't actually need to know what a Fourier transform does to implement this, but anyway, what it does is to convert your image into frequency space - the resulting image is a strange-looking representation of the spatial frequencies in the image. The inverse, of course, transforms back to space.., er, space. Think of it like a graphic equalizer for images. You can think of blurring an image as removing high frequencies from it, so that's how Fourier transforms come into the picture.
Implementing this is actually fairly straightforward, but there are a lot of nasty details to worry about. First of all we need some functions to do the transform and its inverse. These can be found in the class FFT. This is not by any means a super-optimized implementation - you can find many of those elsewhere on the Internet. Next, we need to convert the kernel into an image the same size as the image we're blurring (I'm sure there are ways to avoid this, but I don't know enough maths - if only I'd been listening in those lectures). We also need to pad out our source image by the radius of the blur, duplicating the edge pixels as it's hard to get the FFT to deal with edges like this. Now, the FFT works on complex numbers, so we need to copy the image and kernel into float arrays. We can do a trick here - our images have four channels (alpha, red, green and blue) so we need to do four transforms plus one for the kernel, making five, but since we're using complex numbers we can do two transforms at once by puttng one channel in the real part of the array and one channel in the imaginary part. Now things get easy, just transform the image and kernel, complex multiply them together and inverse transform and we have our image back, but convolved with the kernel. One last tiny detail is that the transformation process swaps over the quadrants of the image so we need to unswap.
Only one small detail remains: the FFT only works on images which are a power of 2 in each direction. What we have to do is to add twice the blur radius to the width and height, find the next highest power of 2 and make our arrays that size. For big images this has a couple of problems: One is that we're using up lots of memory. Remember we have our images in float arrays and we need 6 of these arrays, each of which is 4 times the size of the image when it's been expanded to a power of two. Your Java virtual machine may well complain at you if you try this on a big image (I know, I've tried). The second problem is related: Things just go slower with the large images because of memory caching problems. The answer is to split the image up into tiles and blur each tile separately. Choosing a good tile size is an option research problem (i.e. I haven't been bothered to experiment much), but is tricky - we need to overlap the tiles by the blur radius so if we chose a tile size of 256 with a blur radius of 127, we'd only be blurring 4 pixels with each tile.
Try it out in this applet:
Threshold Blurs
Something which is often wanted is a blur which blurs parts of the image which are very similar but preserves sharp edges. This is digital wrinkle cream and you can see this in any movie poster ever printed - the stars' faces have all those nasty blemishes ironed out without the image appearing blurry. Often this is so overdone that the actors look like waxworks or computer-generated figures.

Original Image and Threshold Blur
The way we do this is to do an ordinary convolution, but only count in surrounding pixels which are similar to the target pixel. Specifically, we have a threshold and only include a pixel in the convolution if it differs from the center pixel by less than the threshold. Unfortunately, the short cuts we took above won't work here as we need to include a different set of surrounding pixels for each target pixel, so we're back to the full convolution again. Now, although this is extremely dubious, it actually works quite well to still do the two 1D convolutions for a Gaussian blur which is faster than doing the full 2D convolution, so that's what I've done here. Feel free to modify the source to do the full thing.
Try it out in this applet:
Variable Blurs
So far we've only talked about uniform blurs - where the blur radius is the same at each point. For some purposes, it's nice to have blurs which have a different radius at each point in the image. One example is simulating depth of field: You could take an image which is in focus all over and apply a variable blur to it to make parts look out of focus. Real depth of field is more complicated than this because an object which is behind another object shouldn't receive any blur from the object in front, but we'll ignore that and leave it to the professionals.
Now, our fancy tricks above aren't going to help us much here as everything involves precalculating kernels or relies on the blur radius being the same over the image and at first sight it looks like we've got no option but to fall back on the full convolution at each pixel, only this time it's much worse as the kernel might have changed from the previous pixel. However, all is not lost. Remember that trick with box blurs where we just added in pixels as they entered the kernel and subtracted them as they left? It seems as though this won't work in the variable radius case because we'd have to keep totals for every possible radius, but there's a modification we can make to the trick which enables us to magically pull out the totals for any radius with only one subtraction. What we do is preprocess the image and replace every pixel by the sum of all the pixels to the left. That way when we want to find the total of all the pixels between two points in a scanline, we just need to subtract the first from the second. This enables us to do a fast variable blur using a modified version of the box blur code above. Dealing with the edges is slightly more complicated as simply subtracting the totals doesn't work for pixels off the edge, but this is a minor detail. We also need a bit more storage space because the totals will go above the maximum value of a pixel - we'll need to to use an int per channel instead of storing four channels in one int.
Variable Blur - increasing with radius
Well, OK, but this is a Gaussian(ish) blur isn't it? What about doing that lens blur thing with variable radius? Unfortunately, you're out of luck here. I'm not saying there isn't a super fast way of doing this, but as far as I know you're going to have to do the full convolution thing.
Try it out in this applet, which blurs more as you move to the right:
Sharpening by Blurring
You can use a blur to sharpen an image as well as blur it using a technique called unsharp masking. What you do is take the image and subtract a blurred version, making sure you compensate for the loss of brightness. This sounds like magic, but it really works: compare this image with the original.
Sharpening with Unsharp Mask
Try it out in this applet:
Glow
If subtracting a blurred version of an image from itself sharpens it, what does adding it do? As ever, there's no need to guess - I'm here to inform you. What you get is a sort of glowing effect which can look quite nice, or quite cheesy depending on your point of view. Varying the amount of blur added in varies the glowing effect. You can see this effect used a lot on television for dreamy-looking transitions.
Glowing Blur
Try it out in this applet:
Making Shadows
Making a shadow is just a matter of creating an image which looks like the silhouette of the the shadowing object, blurring it, possibly distorting or moving it, and pasting the original image over the top. As this is a really common thing to want to do, there ought to be a filter to do it, And here it is...


Adding Shadows
This is actually a very simplistic implementation - it just blurs the shadow and draws the original image over the top. In practice, it's better to not bother blurring the pixels which are completely hidden by the object.
Casting Rays
We can do the same trick to make light rays appear to come out of an object, only this time making the shadow color white and using a zoom blur instead of the ordinary blur, then adding the result on top of the original.
Light Rays
The rays often look better if you only cast them from bright parts of the image, so the filter has a threshold which you can set to restrict rays to bright areas. This is a good effect to animate: make the centre of the rays move across the image and you get the effect of a moving light source behind the image.
Conclusion
Well, that's it, and I've not even mentioned other blurring methods such as IIR filters, recursive filters and all those other nasty things. I hope you come away with something useful from this, even if it's just a burning desire to buy some green ink and write me a letter.
Finally, you may have noticed that the source above relies on some other classes. Don't worry, here they are: