Image Editor - Painting
The painting system in the Image Editor is fairly sophisticated, allowing a variety of natural and not-so-natural effects.
Painting Tools
The Image Editor provides four painting tools: the Brush, Clone, Eraser and Pencil tools. As we shall see, only the first of these is actually necessary; the other three are simply shortcuts which override properties of the current brush. The eraser tool simple sets the brush blend mode to Stencil, while the clone tool sets the brush paint mode to Clone. This mechanism allows you to use the same brush for painting and erasing simply by switching the tool you're using. The Pencil tool forces brushes to be painted on pixel boundaries which is useful for editing small images such icons where you want to paint individual pixels.
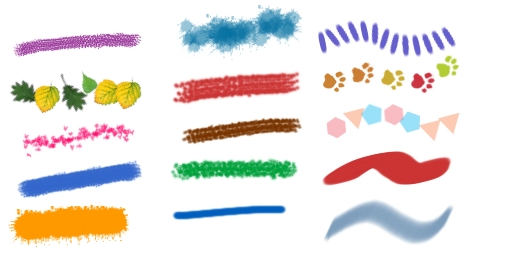
Some sample brush strokes
The main painting tool in the Image Editor is the Brush Tool. This paints with brushes which are built it to the editor or loaded from brush files. Brushes are quite simple, but have a lot of parameters to set which can dramatically change their look.
Brushes
A brush consists of a set of images which define its shapes and a whole load of parameters which are used when painting. At each step in the brush stroke, the brush tool chooses which brush shape to use, picks up some paint onto the brush, transforms the shape by scaling, rotating or translating it, and dabs the paint onto your image. Each of these steps in the process can be modified in many ways.
Paint Mode
There are four possible paint modes for brushes: Paint, Mask, Clone and Dab. Paint simply paints the brush image. You can see this in the "leaves" stroke above. Mask uses the brush image as a mask to paint the current paint color. This is the most common paint mode. Clone uses the brush shape as a mask to paint from another image, called the clone source. Dab is like Clone, but samples the color in the clone source and uses the brush shape as a mask to paint that color.
Blend Mode
You can use any of the normal blend modes for painting. Some interesting ones are:
- Silhouette: Makes the brush act as an eraser.
- Add and Subtract: Can be used to lighten or darken areas.
- Saturation: Can be used to saturate or desaturate an image.
- Hue and Color: Tint the image.
Angle, Radius, Scatter, Scale, Rotation and Follow Path
These parameters control the way in which the brush shape is transformed before each dab. Radius sets the size of the brush, and Scale affects how much the brush is randomly scaled before each dab. Scatter controls how much the brush is randomly moved before dabbing. Follow Path causes the brush to be rotated so that it always points along the brush path. You can see this in the "paw prints" stroke above and the one above it. Angle sets the rotation of the brush, added to the path angle if necessary, while Rotation controls random rotation added before each dab. These have a large impact on the look of brush strokes.
Frame Policy
A brush can have more than one image. In fact, what happens is that the brush image can be divided into frames. The leaf brush above has five frames, each with a different leaf. The Frame Policy determines how to choose the frame to use on each dab. Random chooses frames randomly, while Sequentially uses them in sequence. This allows you to do some silly things, like having a brush which paints text along the brush stroke.
Rate
Setting the Rate to anything other than zero makes a brush into an air brush, that is, it continually dabs while you hold the mouse button down.
Tint Variation
For solid color brushes, this controls the random variation of the paint color on each dab. This can be used to make some brushes look more natural.
Roundness, Aspect and Softness
The editor can create simple brush shapes for you. Roundness varies the shape between a circle and a square. Aspect varies the aspect ratio of the bruh - between a circle and an ellipse, and softness varies the softness of the brush edges.
Opacity
Opacity affects the opacity of each dab. Since brush dabs frequently overlap, you may have to set this much lower than you think. The editor will use tablet pen pressure to affect the opacity of brushes if it can.
Creating Brushes
Unfortunately, the Image Editor currently has no UI for creating and saving new brushes. Currently, what happens is that at startup, the editor looks for a folder called "brushes" in the current folder and loads in any brush files it find there. Brush files are simple XML files and any images required by the brush are stored in the same folder.