Image Editor Tips - Embossing
For producing three dimensional effects the main tool is the "Light Effects" filter. This filter simulates the effect of light hitting a bumpy surface and has a variety of uses for embossing, carving and producing rough textures. This filter is more complicated than most and has a large number of settings. It also takes up to three images as inputs. These are:
- The image to be processed
- A bump map
- An environment map
The bump map is a grayscale image which gives the height of the simulated surface, white being high and black low. The environment map is used for reflections in shiny surfaces. For simple cases, you can ignore the extra images and simply use the input image as the bump map.
As a simple example, here is a black and white image passed through the light effects filter. The image is used as the bump map and the surface color is a constant yellow.

Embossing
More interesting affects can be achieved by processing the bump map before applying the Light Effects filter. Blurring the bump map gives a softer, but more pronounced 3D effect as shown in the first picture below. In the second and third pictures, the bump map has been blurred and then the original map pasted back on top to sharpen the edges. In the fourth picture the map was blurred and then passed through the Colors/Lookup filter with a 2-humped gradient which had the effect of outlining the text. Finally, in the last picture, the Shapeburst filter was used to created a chiselled effect.


Different settings for diffuse and specular reflectivity will produce the effect of different materials. For a matt finish, turn down the specular reflectivity. To change the shininess of the material vary the specular highlight slider - the larger the value, the shinier the material.
Here's another way of playing with bump maps. This was created by drawing the text, blurring it with a radius of about 20 pixels and then thresholding to give a sharp edge before drawing the text again. Finally, the whole map was blurred with a radius of 2 pixels.

Making Metal
Here's an example of using embossing to produce a metallic effect. Starting with a grey background, I added noise with the Add Noise filter and smeared it horizontally with the Smear filter before applying a bit of horizontal Motion Blur. The text was drawn in a separate image which was used as a bump map.
Here the Light Effects filter has been used with an environment map (a photo) to produce a reflective metal effect. The background is plain orange with a bit of added noise. The text was drawn in black and while still floating, passed through the Shapeburst filter to produce a bump map with rounded edges. The Light Effects filter was then used with the environment map and finally a light shadow was added with the Drop Shadow filter.

A similar example using the Shapeburst, Light Effects and Drop Shadow filters:

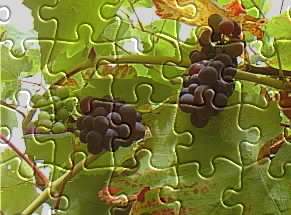
Making a Jigsaw
As another example, you can make your own jigsaws by applying a bump map such as this:
to a photo, giving a result like this:
Making a Jigsaw
To do this:
- Create the bump map
- Open your photograph
- Invoke the Stylize/Light Effects filter.
- In the "Bumps" page, select "Bump Map" and press the "Choose" button to choose the bump map from the list of open images.
- Play around with the light direction, bump height and material properties to get the look you want.
Other Effects
Some of the other filters can be used to create bump maps. Here are a few examples:
The image on the left is the output of the Plasma Filter. When used as a bump map, it produces stone-like textures.
The left image is the output of the Crystallize filter on a white image. The centre image is the left image used as a bump map. Finally, on the right, a semi-transparent layer of the output of the Plasma filter has been painted over the top to colour the tiles.

Lastly, the Cellular texture filter is a good filter for creating geometric patterned bump maps.
Multiple Lights
The Light Effects filter can do much more than simple embossing. So far we have just used the default settings of one distant light source. However, the filter allows several lights to be shone onto the image at once. There are four kinds of light which may be added. These are:
- Ambient Light - Light which is simply added to the image and isn't affected by the surface
- Distant Light - A light which has a direction but no shape. You can think of this as similar to sunlight.
- Point Light - A light which radiates equally in all directions and which has a specific location.
- Spot Light - A light which spreads out in a fuzzy cone in a particular direction.
You've seen ambient and distant light. Here are three coloured spotlights on an image. You can see that the light has an elliptical shape where it hits the surface and a fuzzy edge, just like a real spotlight.

Three coloured lights
Specifying lights is a fairly complex business, but you'll quickly get the hang of it. To add a light, press the appropriate button in the filter dialog. To change its settings, select it in the list and move the sliders. To remove it, select it and press the "Remove Light" button.
Now the settings: All types of lights have an intensity and colour. Distant and point lights add a direction and elevation which together give a direction in 3 dimensions. Point and spot lights have a distance which together with the directions specify where they are in 3D space. Spot lights add a position, X and Y. These are the proportion of the way across the image that the lights are aimed at. Setting these to 0.5 will aim the light at the centre of the image. Changing the elevation will change the shape of the spot. Spot lights also have a cone angle and focus which change the size and sharpness of the spot.

More light effects
The procedure for placing a light goes something like this. First choose the light of light you want. If it's a spot light, aim it at the part of the image you want to illuminate with the X and Y sliders. Next choose a direction and elevation for the light. You can also change the distance to the light which will have the effect of changing the beam size for spot lights or the position of highlights for point lights. It's easiest to position one light at a time, turning the others off by setting their intensity to zero.